Here is the ultimate beginner’s guide to Luminati: Learn what is Luminati Proxy & how does it work, And Luminati.io can seem complicated at first, but are actually easy to use, Let me show you How to use Luminati residential P2P Proxy Network!
Hey, Luminati Networks becomes BrightData in 2021! Not just a proxy provider anymore…
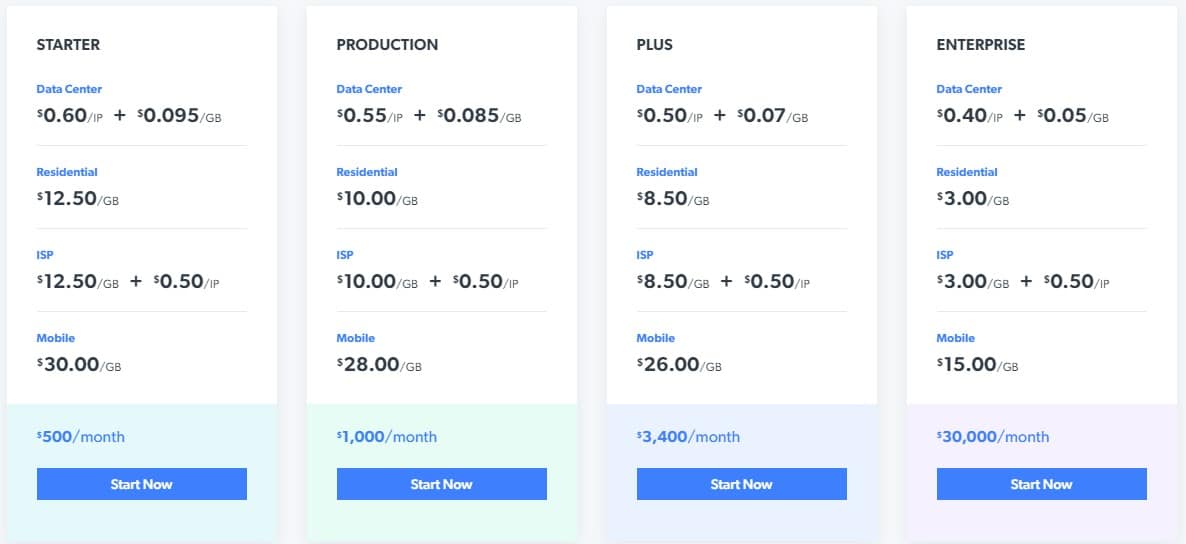
Table of Contents
Looking to scrape the internet? Then Brightdata (Luminati) is the perfect solution for it. With a pool of over 72 million residential IP addresses including data center and mobile IPs as well as the professional solutions for integrating their addresses in your crawler makes them probably the only logical choice.
Do you want to know the network performance of Luminati Proxies? Get our expert’s in-depth research to Proxy Speed & ISP test results and Read expert’s unbiased review Here!
What is Luminati.io?
Only a handful of companies can say that they changed a certain aspect of things. One of those companies is Luminati. Anyone interested in internet privacy has heard of them. It’s one of the most popular proxy selling company.
Founded in 2014, Luminati started as Internet Provider Security or IPS. A year later they had their first Fortune 500 customer. By 2016 they already had over 10 million residential IP proxy addresses. In the meantime, they started selling data center and mobile IP addresses.
They Changed Their Name From Luminati Networks To BrightData on March 17, 2021!
Today they have over 72 million Residential IP addresses across over 200 countries. That only proves that they mean business.
What are the Luminati Residential Proxies?
Luminati is the first residential IP proxies provider! To know more about their Residential IP Proxies, I would like to let you know another sister company of Luminati – named as Hola.
Hola is one of the world’s one of the most popular free VPNs. You can download and use the service for free forever, and with a click, you can install Hola VPN as an extension on your browser. This will let you bypass geo-restrictions so you can watch Netflix from whatever country you want (among other things).
I won’t deep into the technical aspects of the Hola VPN and one thing you need to know is that, when you decide to download and install the Hola VPN or their client software, The VPN opens a permanent port to your IP address. This is all spelled out in their user agreement, so you actually agree to open your computer to the company.
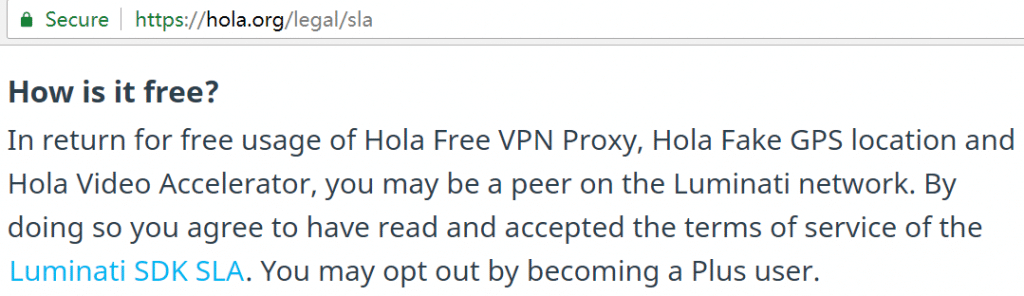
Luminati is a company directly owned and operated in conjunction with Hola VPN, and it allows anyone to utilize this 72 million IP network for their own purposes. If you go to the Luminati website you’ll find a straightforward and very expensive sales pitch: purchase our 72-million-strong residential IP network for a minimum of $300 USD per month.
If this sounds a little ridiculous and messed up, it is. But it’s also spelled out in clear terms in the user agreement of Hola, so those using Hola don’t know or don’t care that their IP addresses are being siphoned off to the highest bidder.
The funny part about all of this is that, inversely, Luminati seems to be the only thoroughly legitimate source of residential IPs. Of course, that’s only if you don’t care that they’re sourced from unsuspecting (but fully participating) users.
Note: Now more and more other residential IP proxies providers appear on the market, But note lots of proxy service run their P2P network in a black-box or botnet for proxies! So, You can not 100% guarantee those residential proxies are 100% legal & safe to use!!!
How it works
Many people compare Luminati with TOR. They do share some similarities, but they are very much different. TOR’s network has a much smaller pool of IP addresses which most websites identify as proxies.
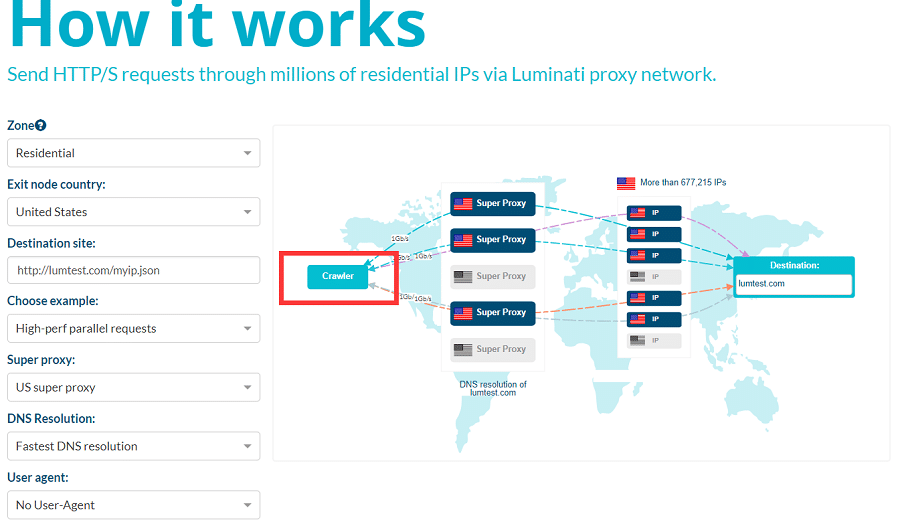
Luminati’s network is P2P or peer-2-peer. That means that none of the addresses that they provide are already marked as proxies. They also claim a failure rate of under 1%, with the right architecture. It’s the Largest Business Proxy Network to use with professional management.
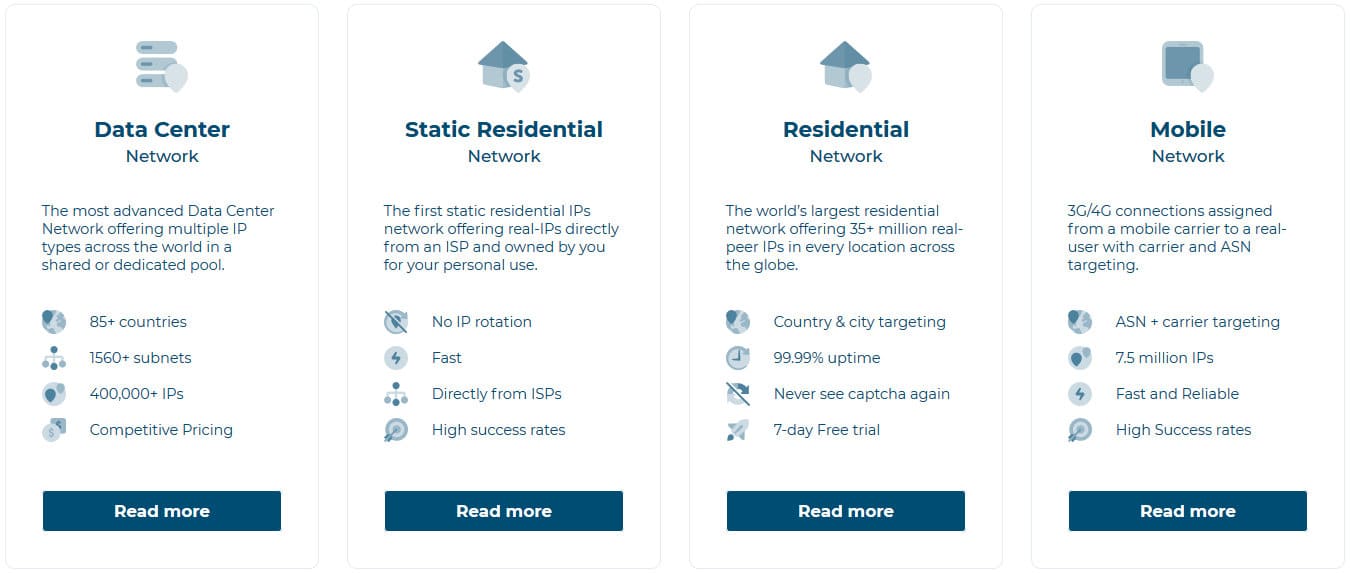
We already mentioned that Luminati mainly offers three types of proxies: data center, roatating residential, Static residential and mobile Network.
 Even though they advertise themselves as a company that is fit mostly for scraping and crawling, you can use them as just a provider to change your IP for browsing or verifying ads.
Today we are going to cover Luminati’s residential IP addresses. We will give a short explanation of how you can use them along with an example. We will also cover the different ways in which you can use them.
Before we dive into how to use the residential IP addresses first we must explain what they are. Unlike data center proxy addresses, residential proxies are IP addresses that are from someone’s home internet connection.
- Read more: What is a residential proxy?
So, when we say that Luminati has 35 million residential IP addresses that means that there are 35 million users all over the world that agreed to have their home IP address used as a proxy.
Overview of Luminati Control panel
Now that we explained what are the residential IP proxy addresses we can start with the tour of Luminati’s dashboard.
Regardless if you intend to use the extension or the manager, the very first thing that you will need to do is set up a few things on the dashboard.
When you log in to your account, you are greeted by the dashboard. There you get a detailed graph on the bandwidth. On the right of it, you have some stats from the Luminati Proxy Manager. On the top, you have the available zones, how much has been transferred and the remaining balance.

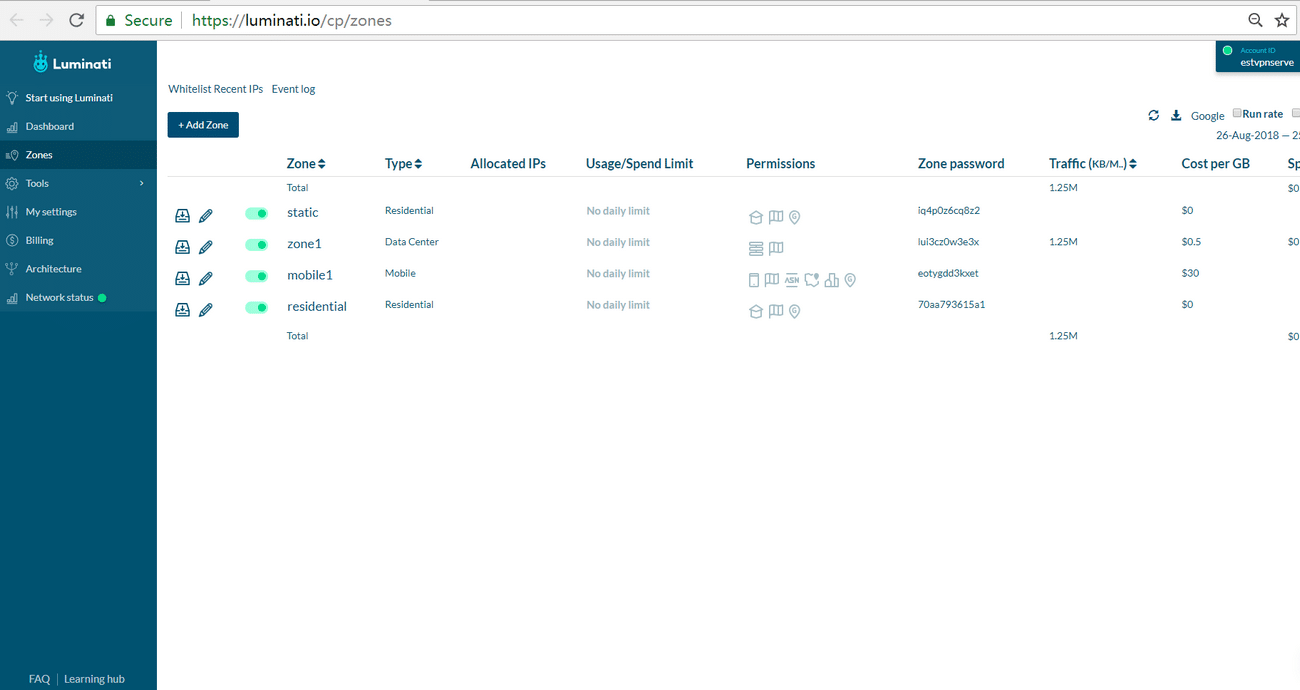
The zones menu is where you can customize the zones, based on your needs and plan. You can create new zones, even if they are the same type. That is the section where you will be authorizing your sessions so that we will go with an in-depth description later.
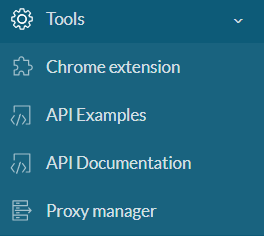
In the tools, you can get some API examples. The codes provided are based on the parameters that you select, and you can’t change them. If you are looking for customizing them, you can do that in the Luminati Proxy Manager.
My Settings is where you can update the user information and the company details. Below that, you have a list of the login history.
You can see the available balance in the billing menu. There is a bar on top that fills up as you are using your bandwidth. Next is the payment method that you need to have if you intend to have auto recharge enabled. On the bottom is the list of transactions.
Architecture navigates you to Luminati’s technology page. There you get a detailed explanation of how their system works.
The last menu is the network status where you check if everything is running smoothly.
How to set up Luminati Residential Zone
This might be the confusing part, but the extension, manager, and dashboard are interlinked in some way.
To be able to use any proxy, first, you need to log in to the dashboard and navigate to the zones. In the top left corner, click on “Add Zone.” A small window will open within the browser where you will need to change a few settings for the residential IP addresses.
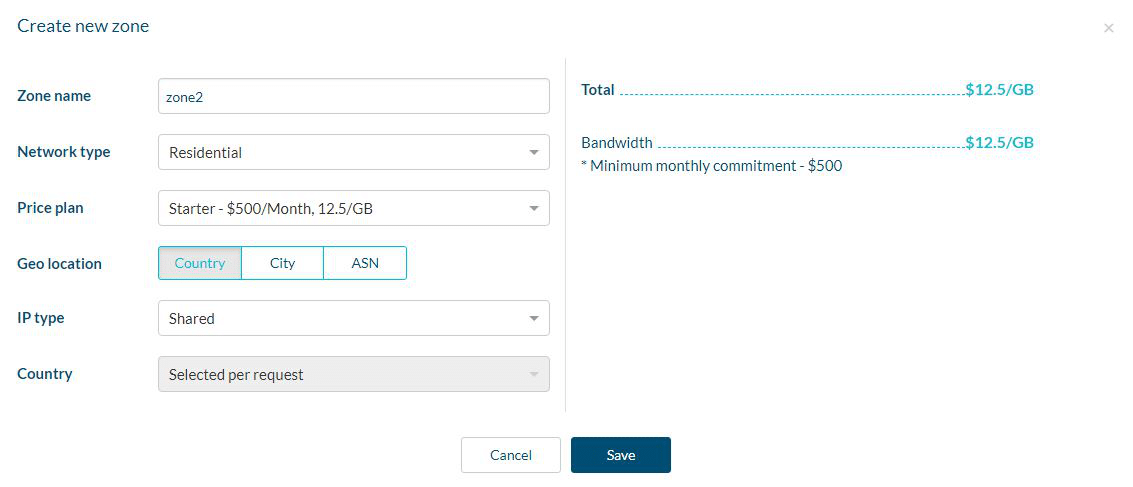
The zone name is the title for the zone that you are creating, you can name it any way you want. Under Network Type select “Residential”. From there you get a few more options to set. First is the monthly plan: Starter, Production, Plus and High Volume. Next is the Geo-Location targeting. You can target by Country, City, ASN or all three.
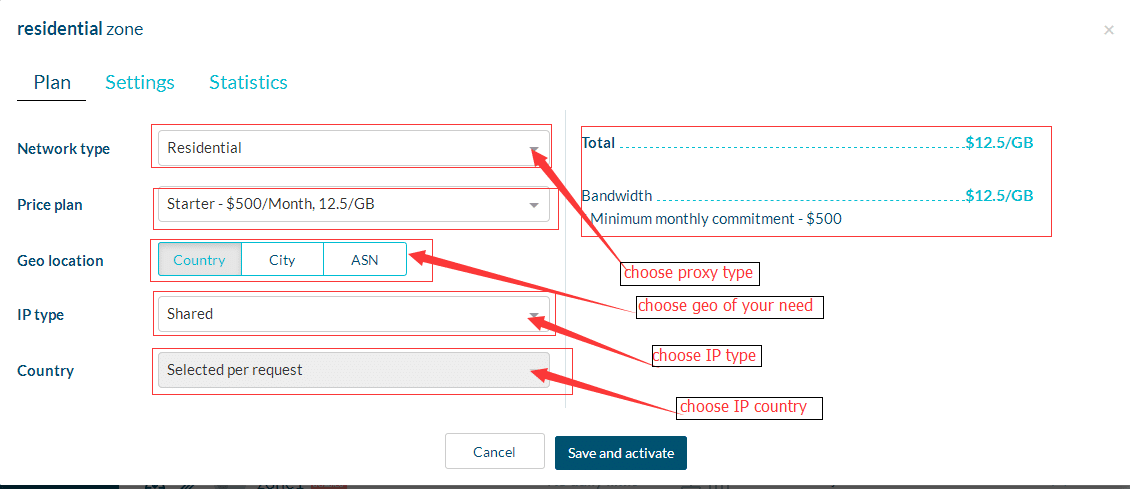
You can also choose between two types of IP addresses: Shared or Exclusive. If you decide to go for the shared IP addresses then you get limited functionality. You can only target by country.
Note: Exclusive residential IPs are really expensive! I would suggest you use the Shared residential IPs!
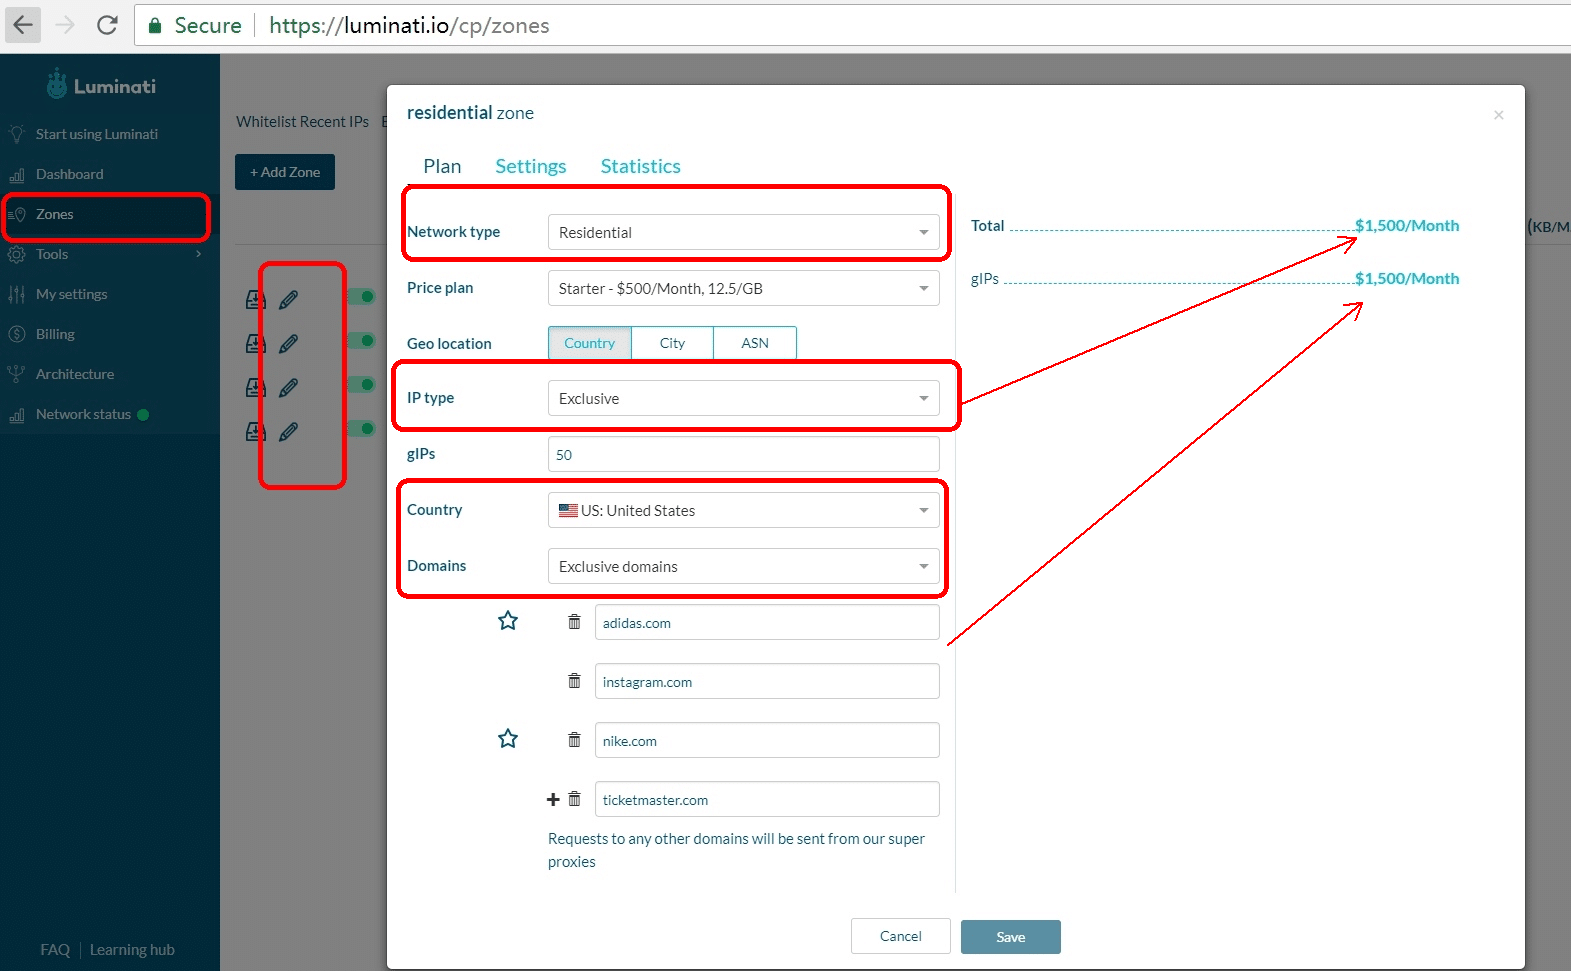
If you select the exclusive IP addresses you can select the number of residential IP addresses that you want. You can also select a specific county for geo-targeting as well as setting the exclusive domains so that only you can use the addresses for those domains.
Finally, click “Save” to create the zone.
How to Authorize
Luminati offers two ways of authentication: by whitelisting IP addresses or with a username and password.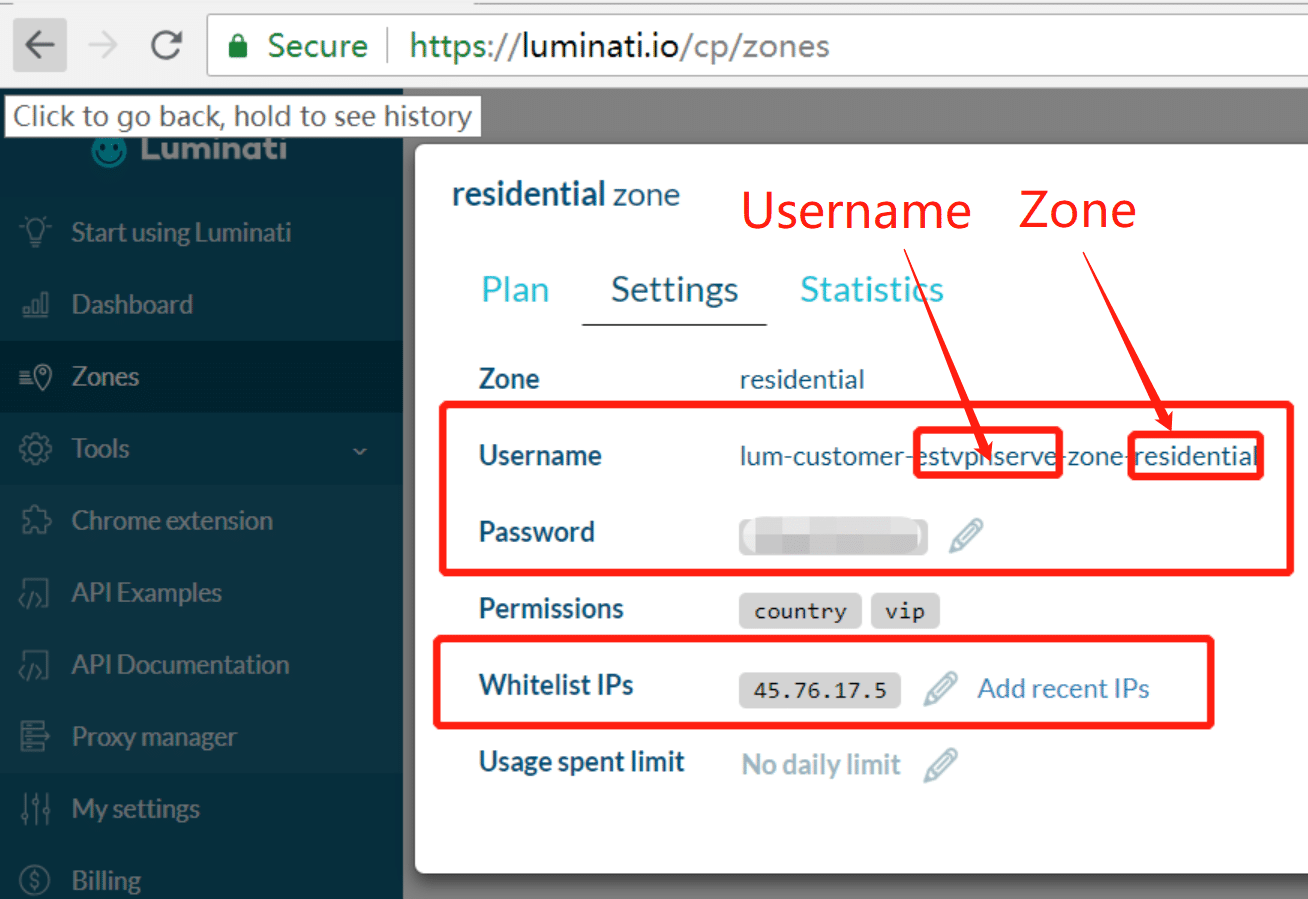
IP Authorization
You can use this type of authorization if you intend to use Luminati’s proxies from one IP address. Enter the zone that you created by clicking on it from the list of zones. On the right side, click on the pencil-shaped icon next to “Whitelist IPs”. Enter your local IP address and click “Save”. If you don’t know your local IP address go to Google and search for “What is my IP”.
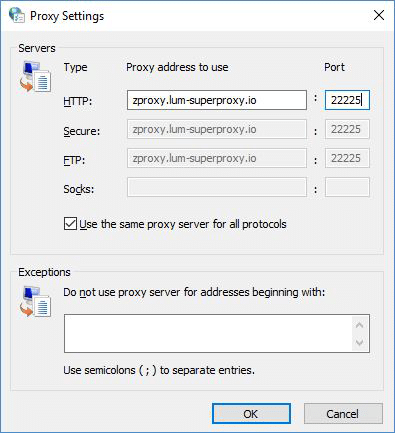
Once this is set up all you will need to do is change your proxy settings on your machine or toolbar that you use. The address for the settings is zproxy.lum-superproxy.io and the port is 22225. As you can see below in our FoxyProxy settings,

And Windows proxy settings for Luminati proxies.
Username and Password Authorization
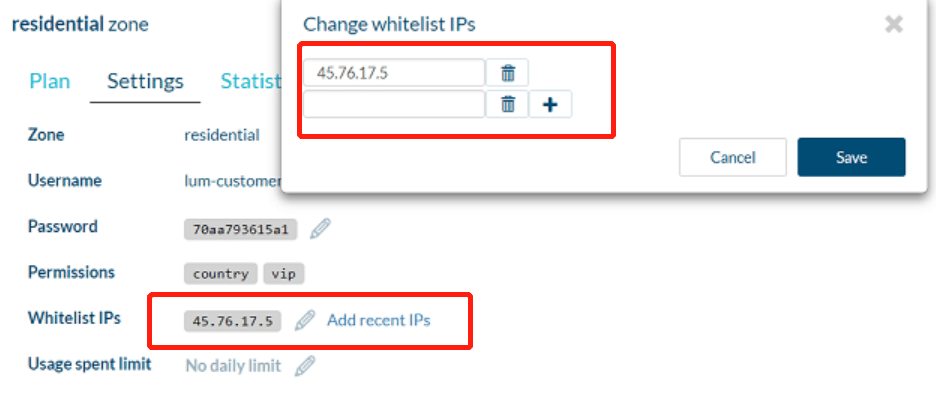
The authorization process with a username and password is slightly different. This is best for users that either have a dynamic IP address or need to use Luminati’s residential proxies on several machines. For this type of authorization first, you will need to make changes to the whitelisted IPs.
Navigate to your zone and on the right side where it says “Whitelist IPs” click on the pencil icon. In the IP address field enter “any” without the quotation marks and click Save. This will enable you to use Luminati’s proxies from any IP address that you log in from.
You will still need to set the proxy settings as you would with an IP configuration, but this time when you try to navigate to a page you will need to enter a username and password. The username is lum-customer-(username)-zone-(zone) where username is the one that you have assigned and the zone is the name of the zone that you created. For example, if your username is “stupidproxy” and the zone you created is “proxyzone” then the username for logging in would be lum-customer-stupidproxy-zone-proxyzone. The password is generated automatically when you create a zone. you can see if by clicking on the zone from the list. There you can either use the generated one or change it.
And with the Username and Password, you not just use the proxy on via your browser, but also you can handle your proxy requests via Luminati’s API, which supports Shell, Java, C#, VB, PHP, Python, Perl and more!

How to use Luminati’s proxies with Chrome Extension
We already mentioned that you could also use Luminati’s Chrome extension. It is the easiest and simplest way to use Luminati. Once the installation is complete, you will need to log in to your account. From this point on you can manage the proxies via the Luminati menu on Chrome or the dashboard.
Changing your IP from the extension is easy. Select the country that you want to get a proxy from or enable “Any” and click the power button. If you wish to cycle through addresses, click the refresh icon next to your IP address.
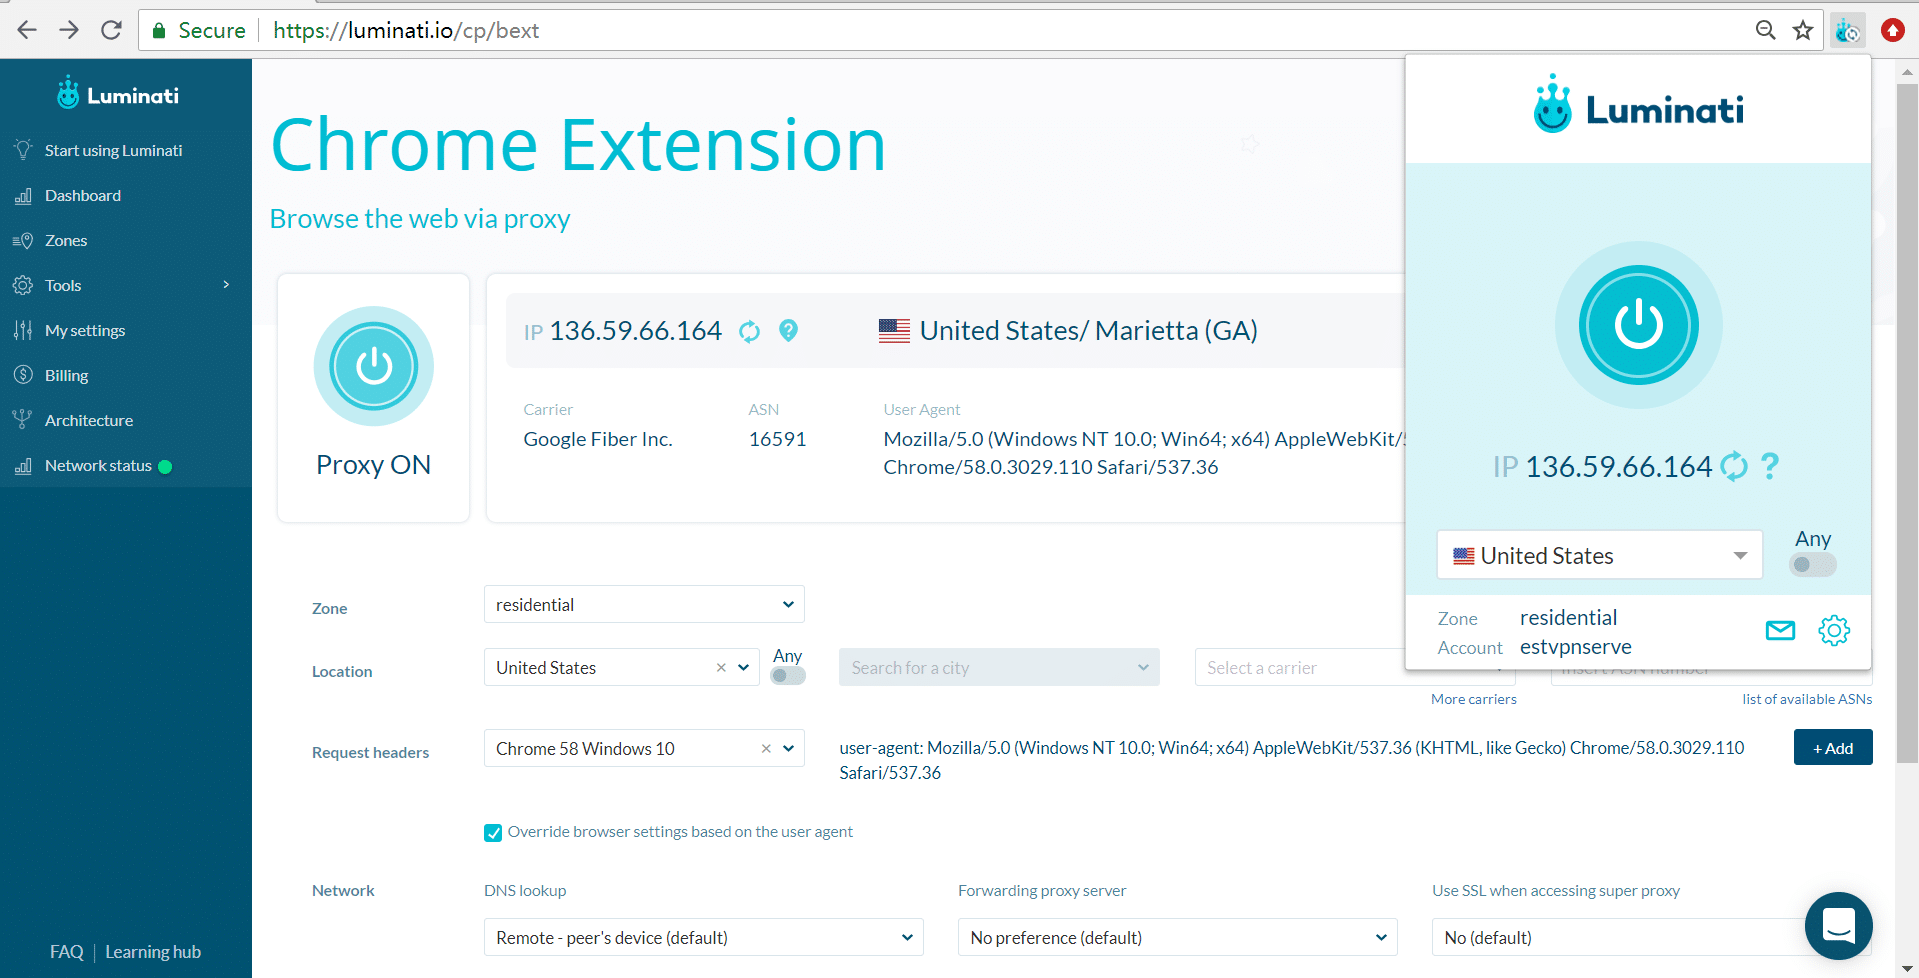
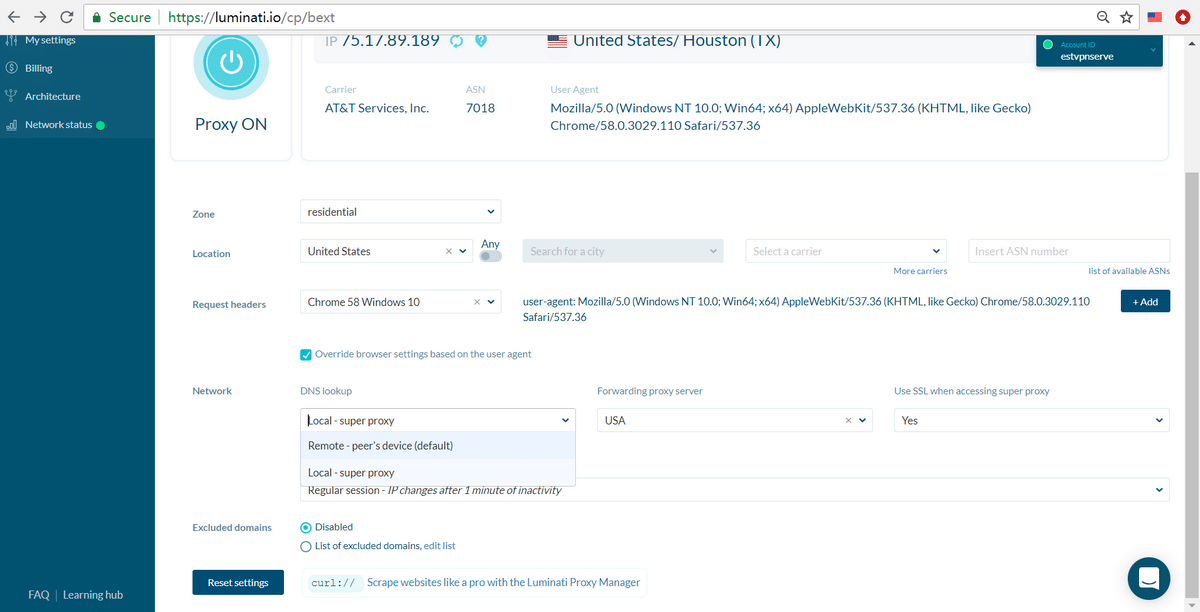
You can get additional settings by navigating to the Chrome Extension panel in Luminati’s dashboard. From there you can customize the location, headers as well as the DNS settings.
How to use Luminati’s proxies via API
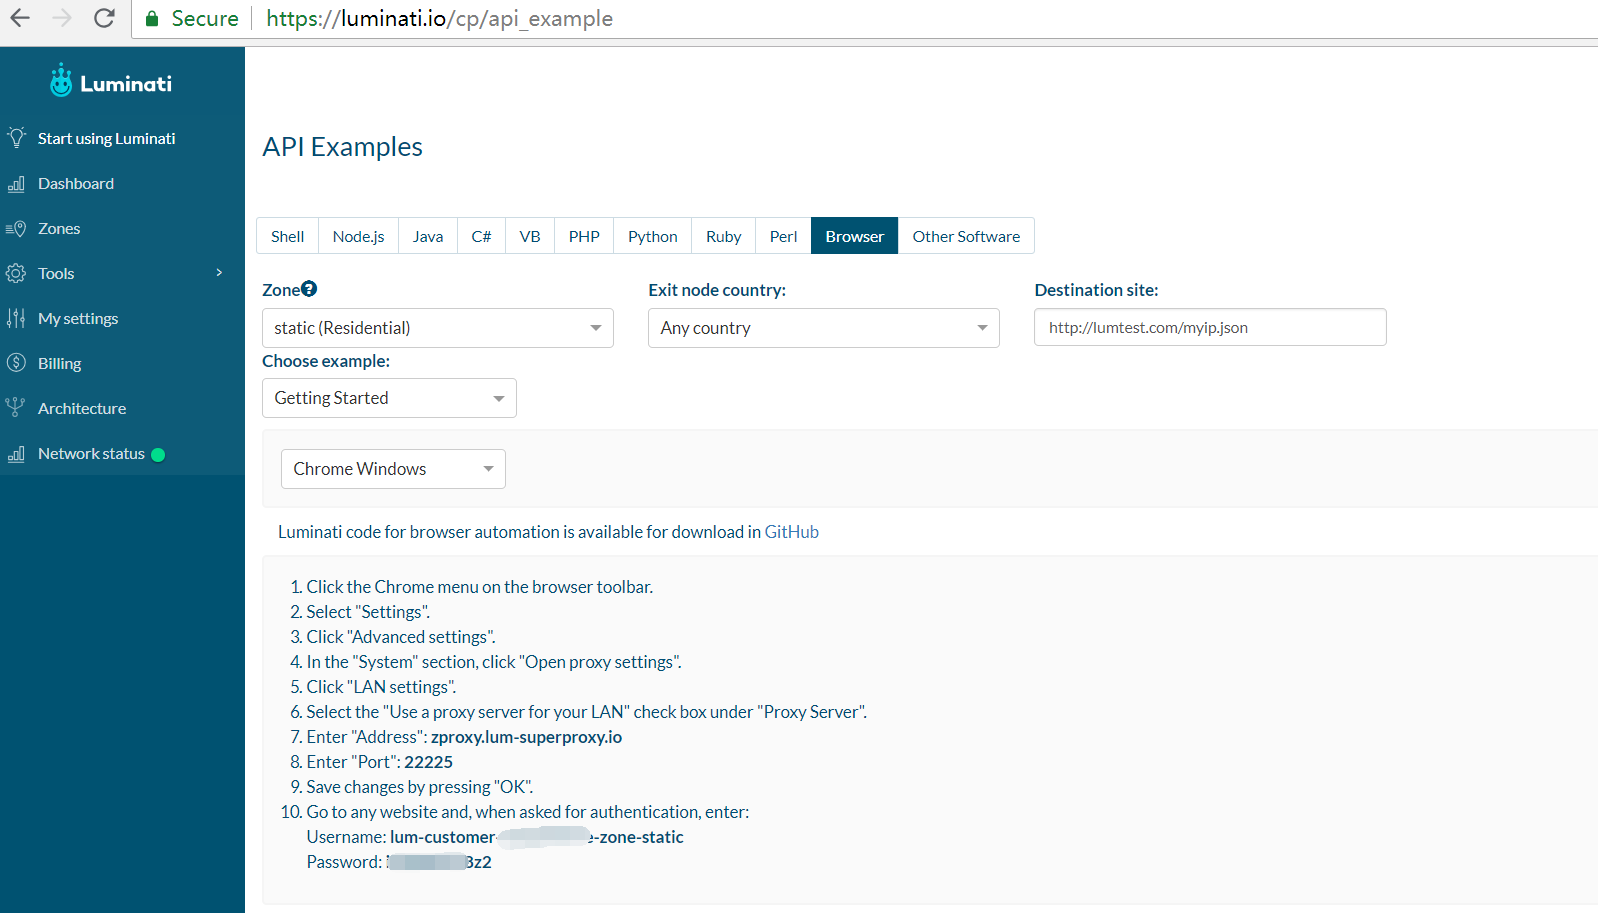
Unfortunately, Luminati only has an extension that works with Chrome. People that use other browsers might need to tinker a bit more with the settings. Here is the API Example for Browser,
If you do not know How to set up a proxy in your browser, Read this Guide!
When you log in to your dashboard you will need to navigate to “API Examples” from the left navigation panel. From there you will get examples for how to use Luminati. From the top bar, you need to select on what you intend to use Luminati.
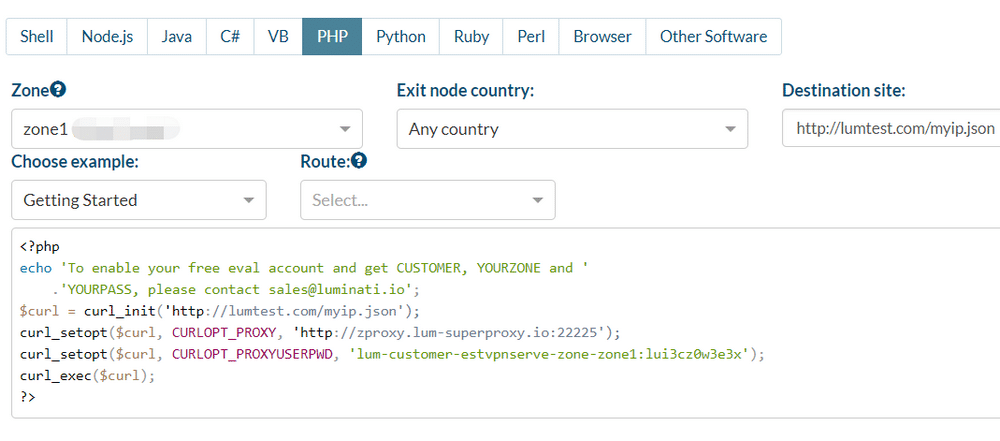

Below that selection, you can select the zone that you created earlier, the targeted location, the destination site, and an example. Whenever you change something, the results that you see below will change accordingly.
And Here is some help Tips to use Luminati proxy networks,
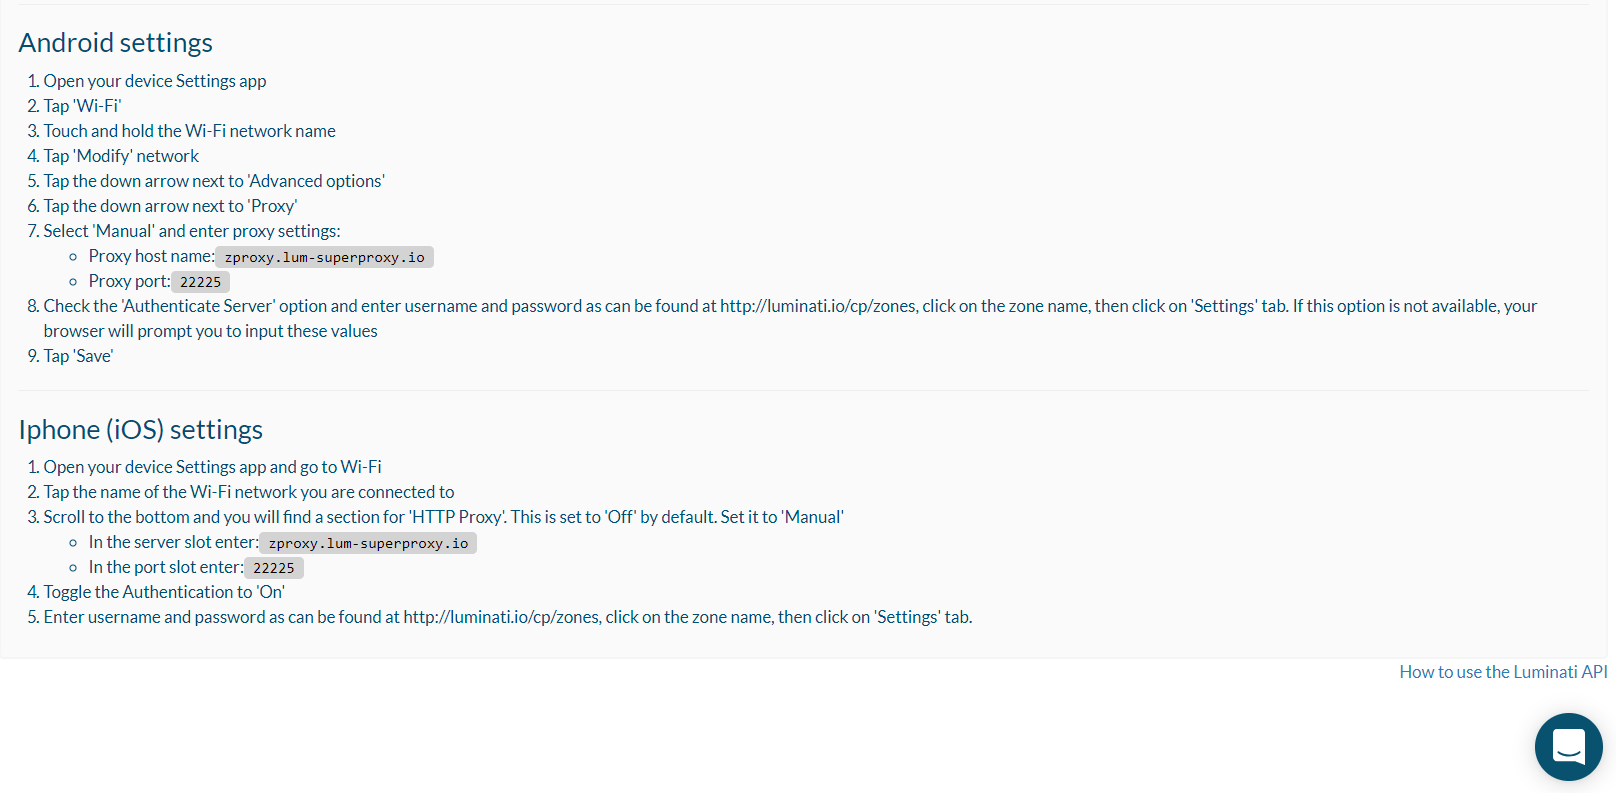
How to use Luminati API in the Android/iPhone (iOS)
How to use Luminati’s proxies for Geo-targeting
The simplest way in which you can do this is with the Chrome extension. We already explained ho you can use it. Navigate to the settings, choose the specific country and apply the settings.
You can also use the username for geo-targeting. Earlier in this article, we outlined how you can authenticate with a username and password.
If you need to use an IP from a certain country the username would be lum-customer-(username)-zone-(zone)-country-(country). Similar to this, if you need an IP address from a specific city the username will be is lum-customer-(username)-zone-(zone)-city-(city).

in both cases, you will need to replace “country” and “city” with the codes from Maximinus geolocation database. (https://dev.maxmind.com/geoip/geoip2/geolite2/)
How to use Luminati’s proxies for a long session
The simplest way to use a single IP for a longer session is through the Chrome extension. Your session will be active with the selected IP address as long as you don’t refresh it.
Another way in which you can use a longer session is with a username and password. The way to do this is by adding “session-(session string) to the username and password. So it should look like this lum-customer-(username)-zone-(zone)- session-(session string), where you replace “session string” with some random string that will tell Luminati’s servers to keep it active. When you need to change your IP all you need to do is change the session string.
lum-customer-{your_customer_id}-zone-{your_zone}-session-rand39484
Also, you can use the Luminati proxy manager (LPM) to handle it.
How to use Luminati Proxies sent requests via LPM
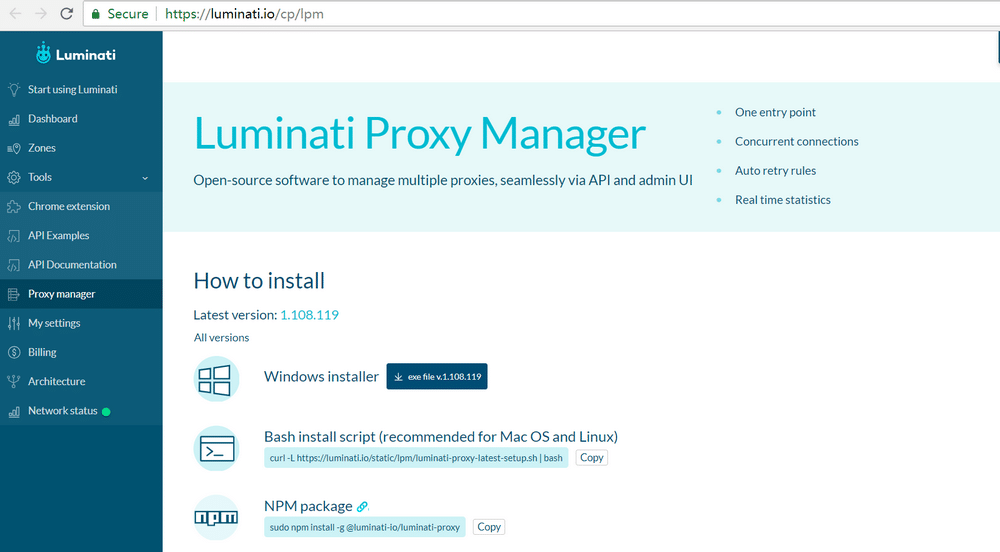
Luminati Proxy Manager (LPM) is an advanced open-source proxy manager for web scraping, Lots of features and funtions of LPM, You can Limit or auto-retry your requests, Create rules for IP rotation, enable the SOCKS5 Proxy via LMP and more…It’s an advanced proxy tool to handle your proxies request, But you have to say, This tool much fit for people who have programming experience.
If you want to get your hand dirty, you can go to the Luminati Proxy Manager. Once you download and install the application, a command prompt window will open. After that, a page on their website will open where you will need to log in with your user and password. If your browser doesn’t open, you will need to do it manually. The address and port will be in the command prompt.
So, How to use the Luminati proxy manager (LPM)?

In the overview section, you need to click on “New Proxy” on the top to start the creation process. Once you do, you can choose between one of Luminati’s proxies or an external one.
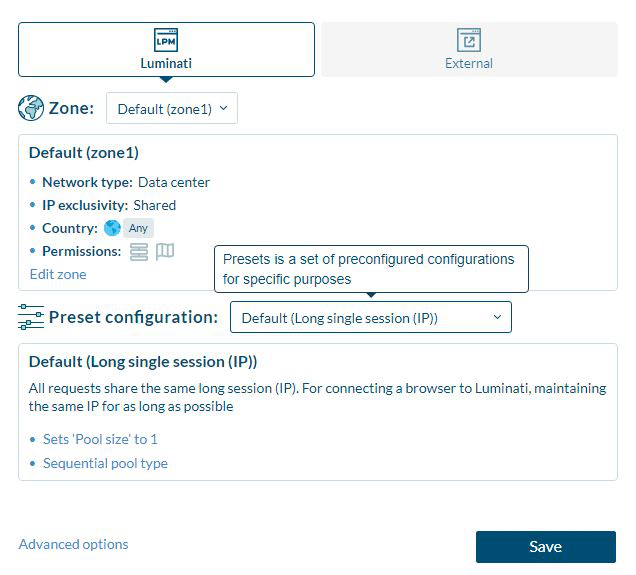
The first setting is to select the zone that you already created. The second half of the menu enables you to select the type of proxy. If you know what you are doing, you can click on “Advanced” on the bottom and set up custom rules for your proxy. When you save your proxy settings, you get the port number assigned for those rules.
The settings for the proxy is different. If you intend on using the proxy manager then the domain for the proxy will be 127.0.0.1 and the port number will be the one you created for a specific proxy.
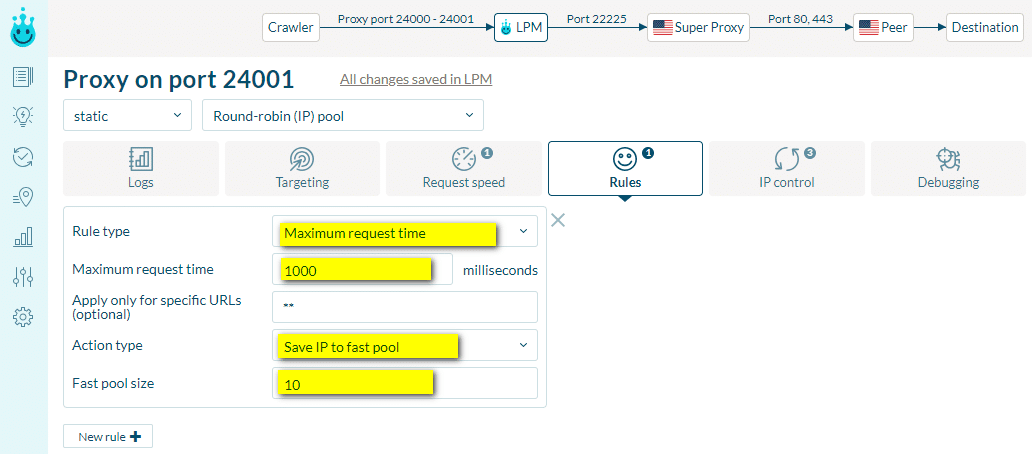
If you need to have a longer session to track product prices or for browsing and the port for that session is 24000, then the settings should be as in the screenshot below.

On the other hand, if you need rotating addresses for scraping data of websites without getting banned and you created that rule in Luminati’s proxy manager with a port number 24001, then the settings will be as below.

Lastly, if you need to target a specific city for posting Craiglist ads, then once you set those rules and get a port number 24002, the settings we suggest as,

Summary
Either the proxy network (The largest p2p proxy network) or Proxy Manager (Support Chrome Extension, Proxy API, LMP), will be worthy of the “#1” residential proxy provider on our list.
Luminati is a service often compared with TOR. Even though they share some similarities, it is a shame for them to be compared. The flexibility that Luminati offers as well as a pool of over 72 million datacenter, residential and mobile IP addresses makes them better in more than one way. But, the complexity of the LPM settings doesn’t make them suitable for first-time users.