Have you received a message that your computer cannot connect to the proxy server? It’s a nuisance, but it’s not necessarily a massive problem. Today, we’ll outline several reasons why you’re seeing it and how to fix it.
We’re living in the golden era of services, things that we cannot do most of the stuff we do online. It doesn’t matter if we’re talking about something we use for fun or work-related; there’s probably a service we rely on.
We use many services and tools, and as you can guess from the title, today we’ll be talking about proxies. Things can go wrong, and you may find yourself in a situation where the proxy won’t work. Specifically, we’re talking about being unable to connect to the proxy server. You may see this message for many reasons, and most of them have a simple fix.
If you’re reading this article, then it means that you already have the proxy set up, meaning that we won’t have to explain that part. Therefore, we’ll dive into why you cannot connect to the proxy server and how to fix them.
Check the Proxy Information
Whenever we’re setting up proxies, the most common way is by relying on the faithful copy-and-paste method to ensure that things are correct and we do things quickly. With that said, not all people use it, and when it comes to proxies, it can cause some issues.
When you’re entering the proxy information, all it takes is to get one number wrong, and you won’t be able to connect to the proxy server. The solution to this is pretty simple – double-check the proxy information and see if there’s a typo. It’s the simplest mistake, which is why people often overlook it.
If you’re using proxies with IP whitelisting, you may want to double-check in the proxy provider’s dashboard. Again, a simple type can cause some problems, and you won’t be able to connect to the proxy server. It’s the same story if you use the username and password method. Double-check if the login credentials are correct.
Run the Troubleshooter
Computers are complex pieces of machinery, and as perfect as they seem, they can have some issues. When it comes to proxies, you may run into a situation where you won’t be able to connect to the server despite the correct proxy information. This could be an issue with the connection, something the troubleshooter may help you fix.
This is a nifty feature that comes with every Windows installation. It allows the operating system to check if there’s a problem and try to fix it without you having to worry. The best part is that it’s all automated, meaning you won’t have to do anything.
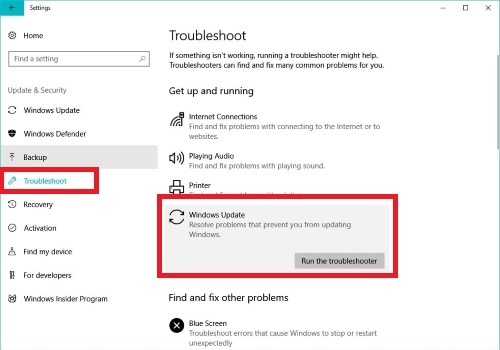
To run the troubleshooter, you’ll need to go into your Windows settings and navigate to “Update & Security.” From the left navigation panel, click on “Troubleshoot,” which will lead you to the next section. On the bottom, click “Additional Troubleshooters” to open up a menu with multiple parts of the operating system that you can troubleshoot.
Select the first item, “Internet Connections,” and click on “Run the troubleshooter”. This will start the process of your operating system inspecting the connection and trying to identify a problem. If there is one, you’ll get an explanation prompt and be asked if you want to fix it. Sometimes, you may not get the prompt, but the connection will be restored, and you should be able to connect to the proxy server.
Once the process is completed, try to connect to your proxy and see if the issue is fixed.
Disable and Enable the Proxy
Whenever you’re trying to find out why you’re getting an error that you cannot connect to the proxy server, it’s essential to find the source of the problem. Seeing this message often means that there’s a problem with the proxy, but that’s not always the case.
To use proxies, first, you need an active internet connection. If you’re having issues with your ISP, you won’t be able to connect to the proxy, but you’ll need to determine where the issue is first. The best way to do that is to disable the proxy and see if you’re connected to the Internet or not.
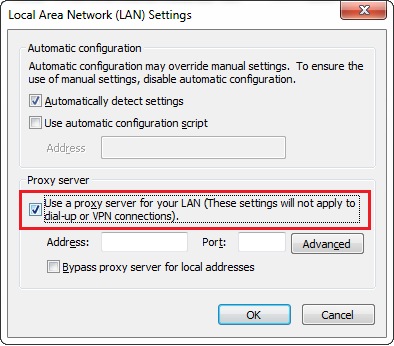
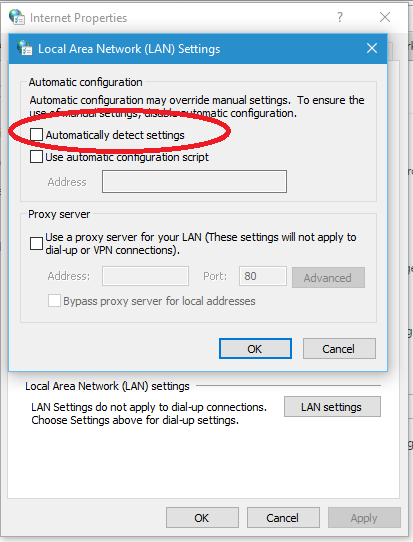
The process is simple and it’s just reversing any proxy settings that you’ve added to your Windows machine. Using the Windows search tool, type “Internet Options” and open the item. On the trop, head over to the “Connections” tab. Under the LAN section, click on the “LAN Settings” button.
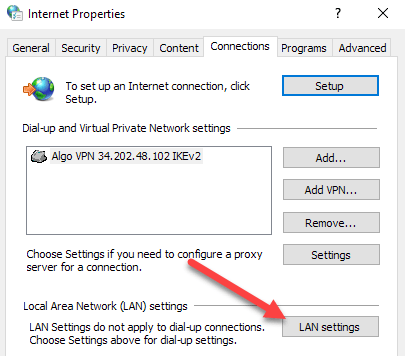
This will open up a new window where you’ll need to make two changes. On the upper part, you’ll need to tick “Automatically detect settings,” and on the bottom, you’ll need to uncheck “Use proxy server for your LAN.” Click “OK” and see if you have issues connecting to the Internet.
If the problem with your internet connection persists, then the problem isn’t with the proxy. On the other hand, if you can access the Internet with no issues, then the proxy is the culprit.
Enable Automatically Detect Settings
Whenever we’re using proxies, we like to be in control and manually set things up. As fancy as it sounds, there are far better ways, including letting your computer decide which settings are the best. This is where the auto-detect feature in Windows comes into play. You can set up your proxy details and let your computer sort out the rest.
To allow your Windows computer to detect the settings automatically, you need to head over to the Settings and navigate to “Network & Internet. From the left navigation panel, click on “Proxy.” The first setting in this section will be “Automatically detect settings,” which should be turned on. If it’s already on, you may try to toggle it off and on and see if that helps with the problem.
Update the Network Properties
Another part of the tinkering process that may cause problems leading to the unable to connect to the proxy server error is the network properties. It’s a similar approach to the previous one, where you let your computer decide which settings to use.
To change the network properties, you’ll need to head over to the Control Panel. Navigate to “Network and Internet” and then click on “Network and Sharing Center”. From this menu, you’ll need to click on “Change adapter settings” on the left.
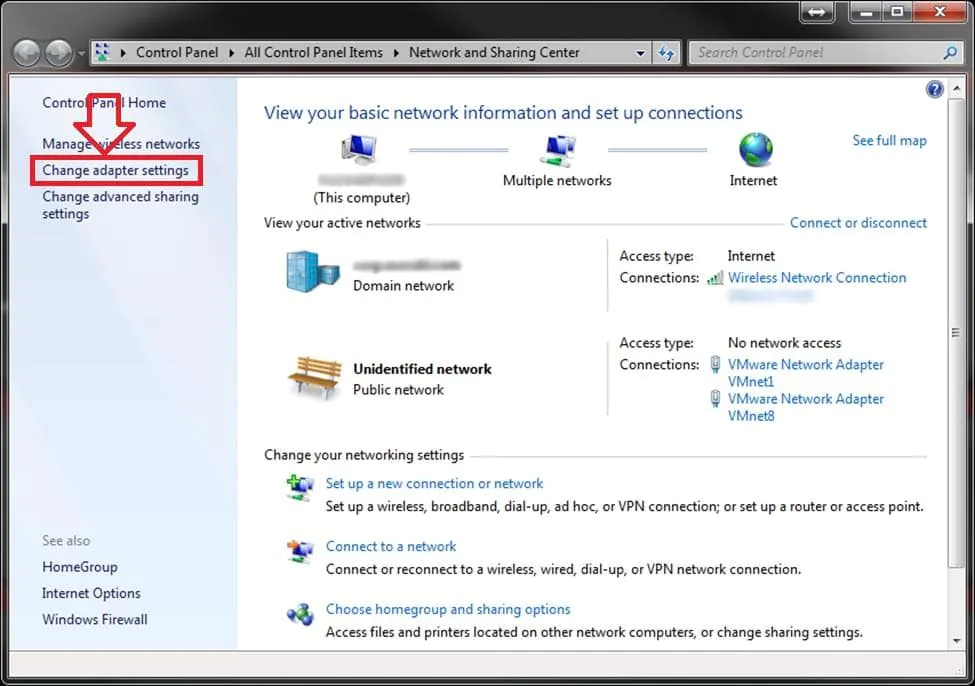
A new window will open with all the network adapters you have. You’ll need to right-click on the one you’re using to access the Internet and click on “Properties.” In the “Networking” tab, find the item that says “Internet Protocol Version 4” and double-click it.
You’ll see another small window with the properties for the IPv4, where you’ll need to have two options selected. In this section, you’ll need to make sure that you have “Obtain an IP address automatically” and “Obtain DNS server address automatically” selected. Once that’s done, click on “OK” and check if the issue is resolved.
Renew Your IP Address
The occasional hiccups with your connection aren’t impossible, something that can be fixed quickly using the Command Prompt. Some people aren’t comfortable, thinking that they can make things worse, but for this, it’s a pretty simple and safe process.
First, you’ll need to run Command Prompt as administrator. Hit the Windows key on your keyboard and type in cmd. When the result appears, right-click it and select “Run as administrator.” Once the Command Prompt window opens, you’ll have two commands you’ll need to enter.
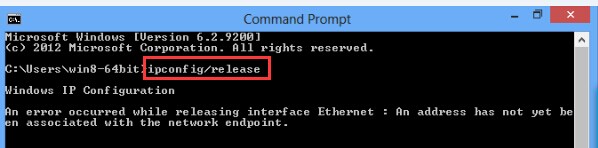
The first command is “ipconfig /release” and hit Enter. The second command is “ipconfig /renew” and hit Enter. Once you’re done, you can close the window and check if you’re still getting the error.
Reach Out to Your Proxy Provider
If all else fails, the last thing you can try is to reach out to your proxy provider. All of the prominent names in the industry are known for reliable proxies, and we rarely see an issue on their end. With that said, proxies aren’t perfect, and sometimes you may come across some issues.
You can reach out to your provider and explain the situation. They can run a diagnostic and determine if the problem is on their end. If that is true, you can request a replacement proxy that will work as intended and one that you can connect to.
Alternatively, if the proxy is working for them, you may get a piece of advice on how to try and fix the problem.
Conclusion
Working with proxies has become a very streamlined process recently. Unlike the olden days, where getting the proxies and setting them up took a bit more effort and knowledge, today, it’s pretty simple.
As good as all of this sounds, things don’t always go as planned. A common issue people face is the error that they cannot connect to the proxy server. It’s an annoying issue, but it’s not one that doesn’t have a solution.
Luckily, we made a list of the most common reasons why you’re seeing this message and how to fix it. The reasons we’ve outlined are the most common ones, meaning that most people who see this message will be able to solve the problem.