Managing proxies on a browser has become a simple process. With that said, some people still struggle to set it up, which is where our guide comes into play. Today, we’ll talk about how to set up SwitchyOmega correctly to avoid any potential struggles.
Proxies have been around for a lot longer than most people think. In the earlier days, they were a lot more expensive and more difficult to come by. Yes, there were providers on the market, but unlike the ones we see today, the numbers weren’t particularly impressive.
Another thing worth mentioning for those days was that we used the proxies manually. We had to enter the proxy information on our computers or routers manually, and there was no way to manage them. As the need increased and the proxies became more available to the masses, we began to see services that helped us with them. One such service is a proxy manager.
These nifty little tools do the heavy lifting, meaning that you can enter the proxy information and let the manager take care of the rest. Depending on the type of manager, you’re looking at different sets of features. This is why some managers are more popular than others, and the one we’ll be talking about today is SwitchyOmega.
It’s one of the most commonly used managers on the market, and in this guide, we’ll explain how to set it up correctly.
What Is SwitchyOmega?
In a world dominated by various proxy managers that come as a standalone application, SwitchyOmega aims to do things differently. This manager is browser-based, meaning you can install it as an extension or add-on and work from there. In terms of compatibility, you can use this on Firefox, Chrome, or most Chromium-based browsers.
Being a browser-based manager means that this is a tool that you’d be using only if you need proxies for something on the web. The rest of the applications on your computer won’t be affected by the proxy. This is a good thing for some, especially if they want to avoid setting a system-wide proxy and then thinking about exceptions. With SwitchyOmega, if it’s an activity from the browser, this is the tool you need.
SwitchyOmega is a free and open-source tool, meaning that you can use it as much as you want without paying or dealing with ads. It comes as a replacement for SwitchyShart, SwitchyPlus, and Proxy Switchy.
In terms of features, there are plenty of those to choose from. Since it’s a proxy manager, the main option is choosing which proxy you’ll be working with. In addition to that, you can also choose if you want to use your proxies or go with different ones. The tool also covers using a direct connection or using the system proxy. To make things even more flexible, SwitchyOmega also has an auto-rotate feature.
Despite being a tool for your browser, SwitchyOmega is a powerful proxy manager, and now we’re going to explain how to set it up correctly.
How to Set Up SwitchyOmega Correctly?
SwitchyOmega is a robust tool for managing proxies, and today, we’ll cover the basic setup, and the process starts with installing it. Head over to the Firefox or Chrome store and get the tool. The installation is quick, and the manager will install it automatically. On the top right corner of your browser window, you’ll see the SwitchyOmega icon. Click on it and navigate to “Options“.
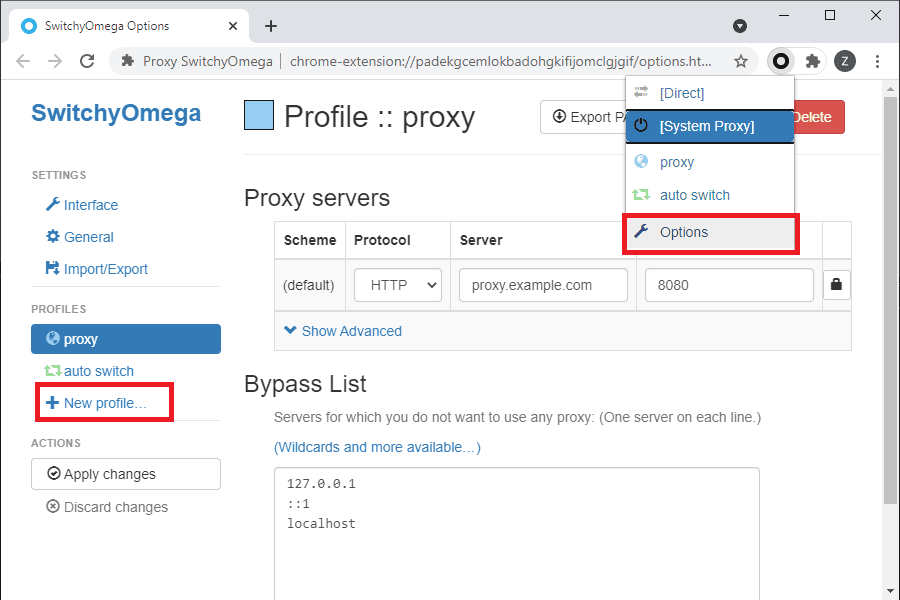
A new tab will open with all the options this manager offers. Out of the box, SwitchyOmega comes configured with some generic profiles, but we’ll explain how to create your own. Start the process by clicking on “New Profile” from the left navigation panel.
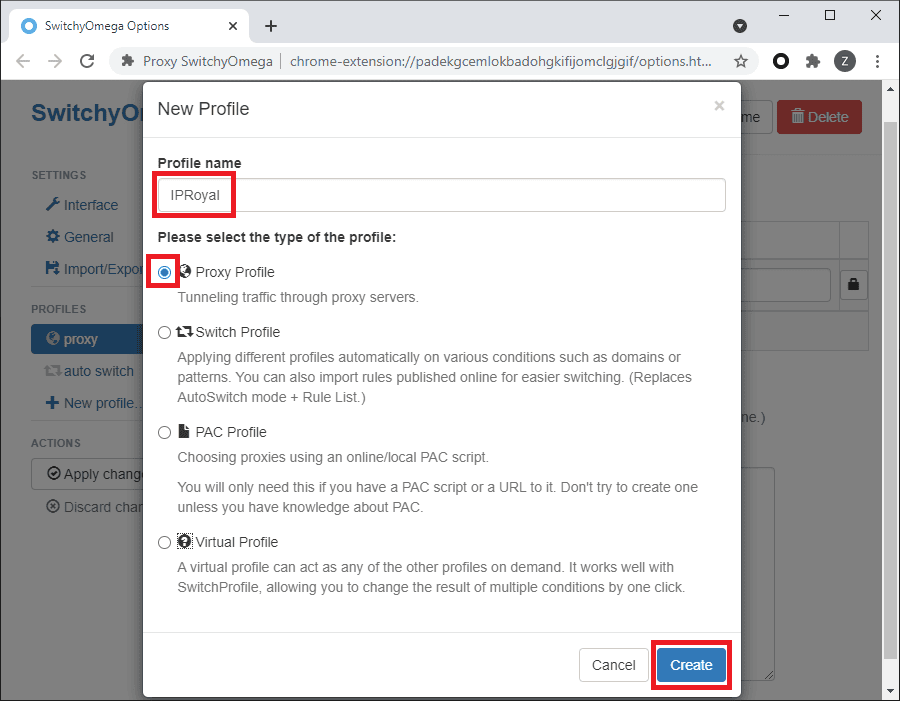
You’ll get a small window where you’ll need to choose the type of profile you’re creating. On the top, there’s a text field where you’ll need to enter the profile’s name. Next is the type, and you have 4 to choose from proxy, switch, PAC, and virtual. Since we’re talking about setting up proxies, for this guide, we’re going with “Proxy Profile.” Once you have everything selected and filled out, you’ll need to click on “Create” to finish this part of the process.
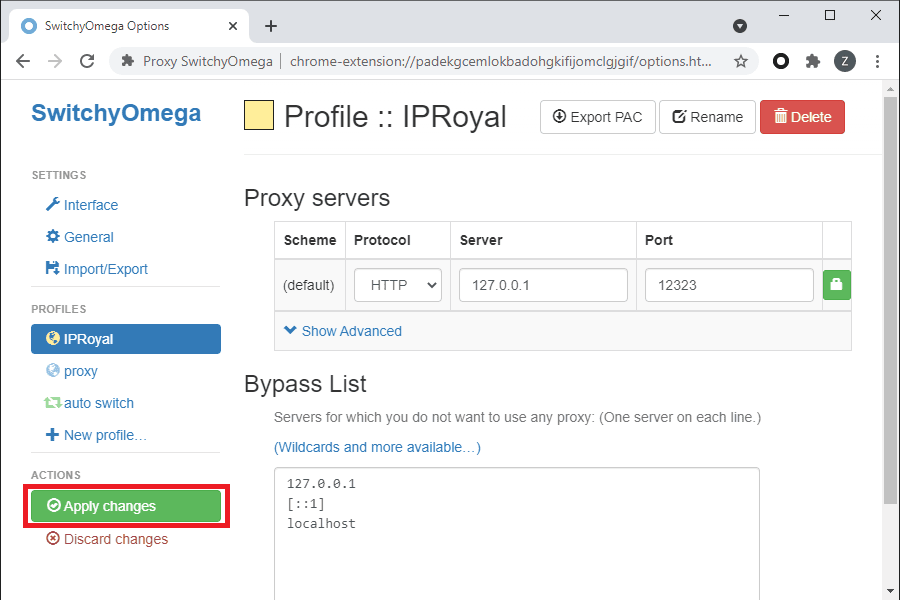
You’ll see the new profile name on the left side of the dashboard, and you’ll need to select it. For this, you have two things you’ll need to do. The first is to set up the proxy server you plan to use. There are 3 fields that you need to populate: the protocol, server, and port.
On the right of these 3 is a button with a padlock icon. This is for the authentication, and it’s an optional setting. If you’re using proxies with IP whitelist authentication, then this is something that you can skip because you aren’t using login credentials. On the other hand, if your proxies need to be authenticated with a username and password, then you need to do this.
Clicking on the icon will bring up a small window where you’ll need to enter the login credentials. Once you complete that, click on “Save changes“. The authentication is almost instant, and you’ll see that the area around the padlock is green, meaning that the proxy is authenticated.
Before you save your work, there is another optional step when it comes to setting up the profile. Below the proxy settings is a bypass list, allowing you to set a list of hosts for which SwitchyOmega won’t use proxies. You can add as many websites or IP addresses as you want, where each one needs to be in a separate row.
With that out of the way, the final step is to click on “Apply changes” from the panel on the left, and the profile will be created and saved. To activate it, you’ll need to click on the SwitchyOmega icon on the top right corner of your browser and choose your profile.
How Many Profiles Can I Create on SwitchyOmega?
SwitchyOmega is a tool with no limitations, meaning that you can create as many profiles as you need. Also, this comes without a cost, so you can create the profiles without worrying about getting charged for them.
Does SwitchyOmega Come with Proxies?
It’s important to remember that SwitchyOmega is the tool for managing the proxies. Therefore, it doesn’t come with proxies, meaning that it’s something you should get separately. We recommend getting proxies from reputable providers for the best possible performance and security.
What Kind Of Proxies Work with SwitchyOmega?
The most important thing to note about SwitchyOmega is that it’s a manager only, meaning that it’s designed to help you with the proxies. As a result, this tool will work with any kind of proxy you can throw at it. The best thing is that it also works with most of the popular protocols, so there are practically no limitations in terms of what you can use on this tool.
What Are the Best Proxies for SwitchyOmega?
When it comes to choosing the proxies for SwitchyOmega, it’s important to talk about the specific use case. All 3 types of proxies offer advantages and disadvantages, so we recommend getting the ones that best suit your needs. If you’re after better performance, then datacenter or ISP is the better option. On the other hand, if you want more anonymity or better geo-targeting features, residential or mobile proxies seem to work better.
Will SwitchyOmega Work with Free Proxies?

This is the same answer as before. SwitchyOmega is just the proxy manager, meaning that you can load any proxies you want, including free ones. As tempting as that may sound, we wouldn’t recommend it. The first real problem with free proxies is the performance. You won’t get the speeds you’d get with paid proxies, even those that aren’t the best performers in the industry.
On top of that, people who are aiming at anonymity may struggle with the free proxies as well. They are easily detectable, so you won’t have any lick. Finally, there’s the security. Paid proxies are managed by companies, meaning that they stand behind what they offer, and security is one of those aspects. With free ones, you won’t get that because you won’t know who manages the proxy and what happens with the data that goes through it.
Can I Use SwitchyOmega If I Have A System-Wide Proxy?
SwitchyOmega works independently from your operating system and only applies the proxy to the browser. As a result, every other application will work with or without the proxy you have on your computer, depending on the situation.
If you already have a proxy on your PC, then SwitchyOmega will bypass that and use the proxy you have assigned with your profile. There’s also the option to disable that proxy and go with the one you have on your system. It offers a lot of flexibility, depending on what you plan to do and your use case.
Conclusion
There are plenty of services that we use on a daily basis, and in today’s world, proxy managers seem to be a very popular option. They help us apply proxies and manage them in a way that’s easier and more convenient. SwitchyOmega is one of the many managers we have at our disposal.
Unlike some of its rivals, this is an add-on/extension for a browser, making it even easier to set up. With that said, some people don’t get a chance to configure it properly, which is where this guide comes into play. We’ve outlined the basic steps you’ll need to take to set up SwitchyOmega correctly and get the most out of it. Keep in mind that we only covered the basic setup, meaning that there’s more to play around with.