Do you confused about how to use the residential proxies of Geosurf? This guide I would like to show the details of Geosurf’s Control panel and How to Configure and use their residential proxy servers on the window.

Table of Contents
For the past several years, internet privacy is becoming more and more popular discussion topic. Users are becoming concerned with the data that websites collect on them. That is why they are looking for various ways to protect it. One of the many ways to do it is either with a VPN or Proxy.
The proxy address is an IP address located on a server that works as a carrier. The data packets sent from your computer go through the proxy server to the website that you want to visit. Most proxies are un-encrypted, so the data is not protected.
Virtual Private Network or VPN is a separate network “formed” around the user’s public network. This network provides an extra layer of security. It prevents outside sources from gaining access to your data. The VPN also provides you with a public IP address from a different country. With that, you can gain access to content restricted to your country.
About GeoSurf
GeoSurf is one of the many VPN and proxy providers out there. The company is founded in 2009 in Israel, by the same people that created AdClarity. The company offers a wide variety of services and products. All of them intended for users that want to have that extra layer of protection. One of the many things that GeoSurf is popular for is the number of IP addresses and their speed.

Does worth to buy the Geosurf.com Residential Proxies or not? Read our in-depth Geosurf review Here.
What are the Geosurf Residential Proxies
Residential IPs is a solution intended for users that harvest data. GeoSurf has a pool of over 2 million IP addresses in over 130 countries. So, users can send an unlimited number of requests without getting blocked by the service or website.
Today we are going to cover this product as it is the most used and provides the most flexibility. Apart from this, Geosurf also provides other software solutions. They have a browser extension, computer, and mobile application.
Beginner’s guide: How to use the Geosurf Proxies
Want to use Geosurf’s Residential IPs you have to buy their service for no free trial is available. Then you can log in to GeoSurf, you need to navigate to their login page. Since we have the Residential package, we log in through there (on the right). If you purchased the static package, then you will need to log in through there (on the left). To begin this guide, I would like to introduce their Control panel to first.
Overview on Control panel
Geosurf’s control panel is well structured and easy to get around. The main navigation panel on the left is easy to understand, and the options are laid out clearly. Regardless if you are a pro or a first time user, you will have no problem to navigate through their settings. In case you are not sure about a certain feature or option, their FAQ has everything explained.
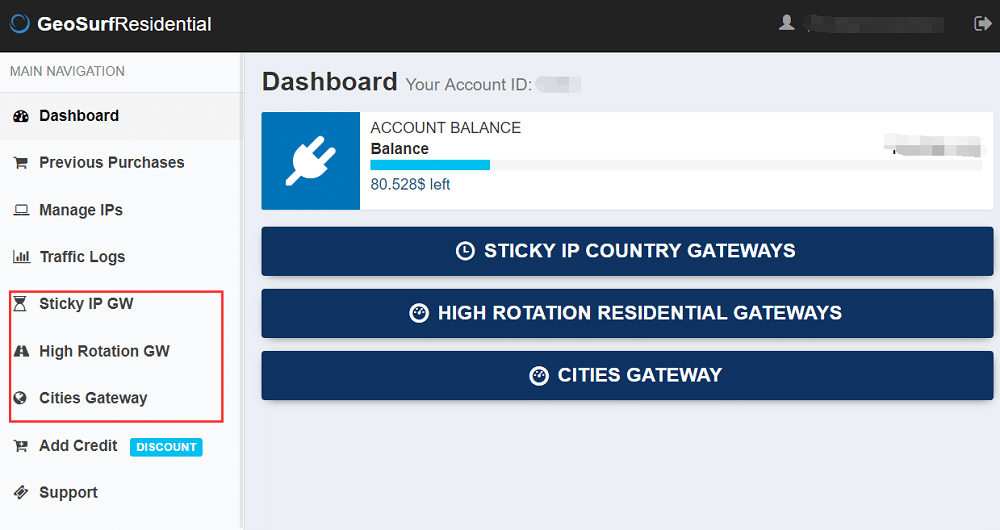
The Dashboard is like the home page of GeoSurf. There you have access to the account balance as well as three types of gateways that you can use. Those are Sticky IP GW, High Rotation Residential and Cities.
Manage IPs are the place to identify your IPs to access their residential proxy networks, I will discuss more details about this later.
The Traffic Logs contains the detailed report on the traffic usage. Whenever you have traffic going through any of the addresses, this is where you can see how much traffic it is.
Previous purchases and Add Credit are for billing. “Previous purchases” is the section where you get an overview of the number of funds added to your account.
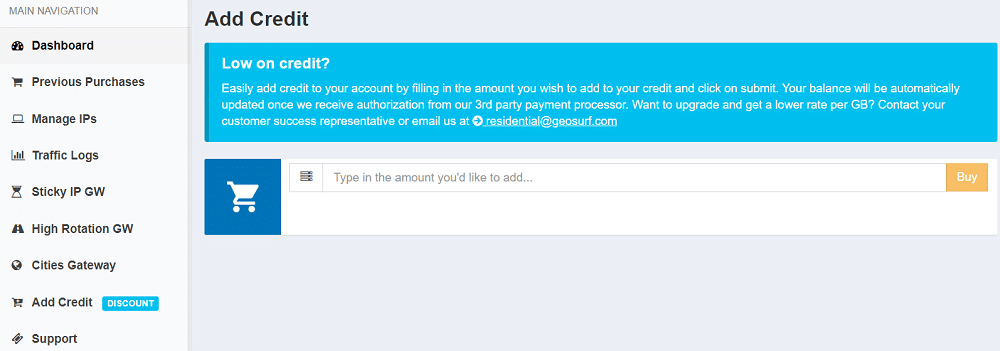
“Add Credit” as the name suggests, is where you add the various amounts of credit to your account for your sessions. There isn’t a minimum or maximum limit, If you exceed the package you buy, charge based on traffic calculate by GB.
The last section is the Support section is the section that you will use when you need to get in touch with GeoSurf.
How to Authentication
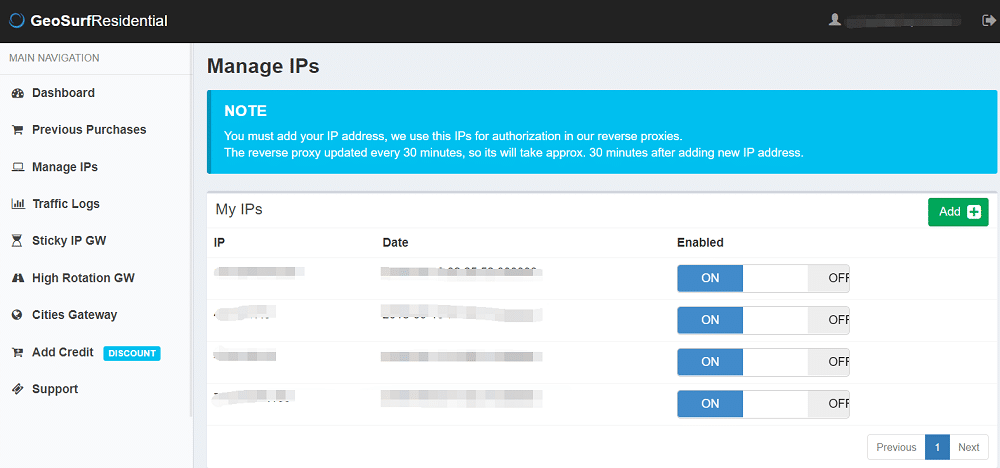
If you want to use Geosurf proxies, the Authentication is needed. You can set it on the section of Manage IPs.
Note: Geosurf not support user:pass authentication. Geosurf is easy to use, and do not support user:password auth, not like some of other residential proxy newwork providers, that use the username control the proxies, such as luminati.io and smartproxy.
It is where you will need to add your public IP address and wait for authorization. The reason for this is unlike other proxies, GeoSurf is P2P. That means that it doesn’t bounce through a bunch of servers. Instead, the traffic goes from your IP address through the one selected. The authorization process can take up to 30 minutes.
If you don’t know your IP address go on Google and search for “What is my IP address.” Any service would suffice. To add your IP address click on the green button in the upper right corner, type it in and click “Submit.” You can add as many IP addresses as you need.
Guide to configure the Sticky IP gateway
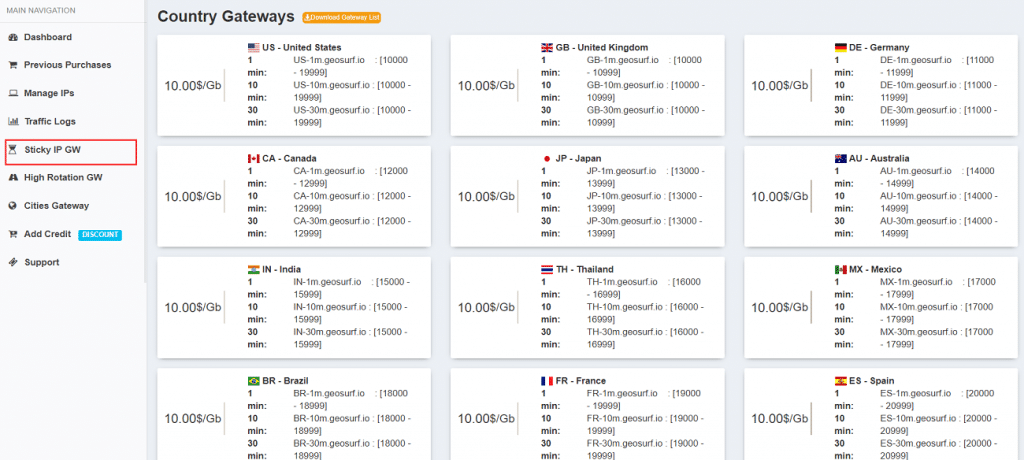
What is the Sticky IP gateway?
Sticky IP gateway mean sticky one IP for a fixed time, that is for when you need to send out many requests to service through one IP address. Depending on your needs, you can use a sticky IP for 1, 10 or 30 minutes. In each country’s details, you have the actual address as well as the port range.
For example, if you are using a US address for 10 minutes, the address will be US-10m.geosurf.io and the port will be anything between 10000 and 19999. Each gigabyte of traffic that you use will cost you $10.
Why use Geosurf Sticky IP?
Since these are addresses that have a limited lifespan and will keep you online for up to 30 minutes, they are extremely useful for in situations when you need to keep a session longer. For example, if you need to access Instagram to verify ads or track prices for products. In the same below, we used a US residential IP address that will remain active for 30 minutes.

Guide to configure the High Rotation Gateway
What is the High Rotation Gateway?
High Rotation Gateway of the opposite of sticky IP. That is when you need to send out many requests each one with the different IP addresses. You can use this when you need to scrape data from a website, and you don’t want your IP address blocked. Unlike the sticky IP, here you don’t get a variety of ports or addresses for different durations. Instead, you get a single address and port that you can use. The IP addresses are rotating automatically by the server, so you don’t need to do anything. The price per 1 gigabyte will cost you $10.
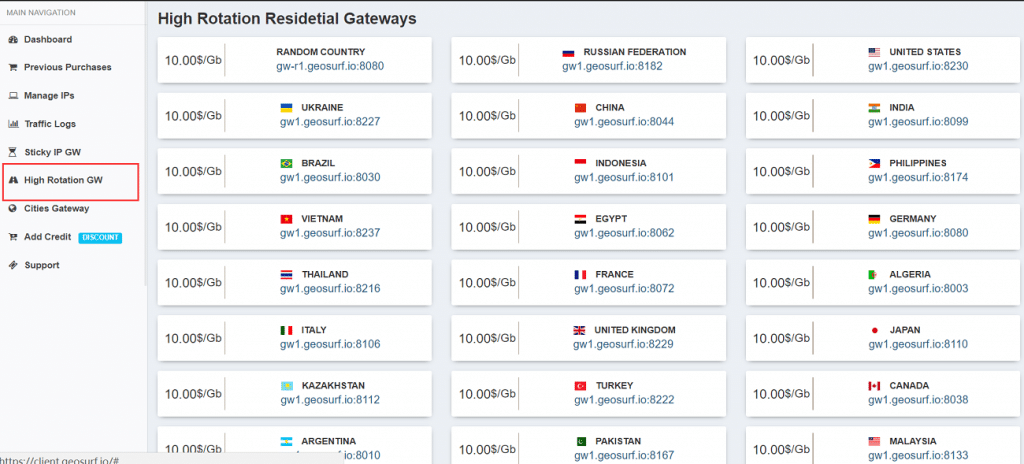
Why use Geosurf High Rotation Residential Gateways
The most common application for high rotating IP addresses is scraping. Geosurf’s has developed an algorithm that will rotate the addresses randomly at a predefined time interval. That enables you to crawl through websites with almost no risk of getting banned. In our FoxyProxy settings, we set up high rotating US addresses.

Guide to configure the Cities Gateway
What is the Cities Gateway?
Cities Gateway is for when users need to access certain content or service from a specific city. Since this is situations where you will not be using a rotating IP address, the same “rule” applies as with the sticky IP addresses. Three addresses for 1, 10 or 30-minute session and a port range. Here you get to choose a specific city, unlike the sticky IP section where you get a random IP from that country.
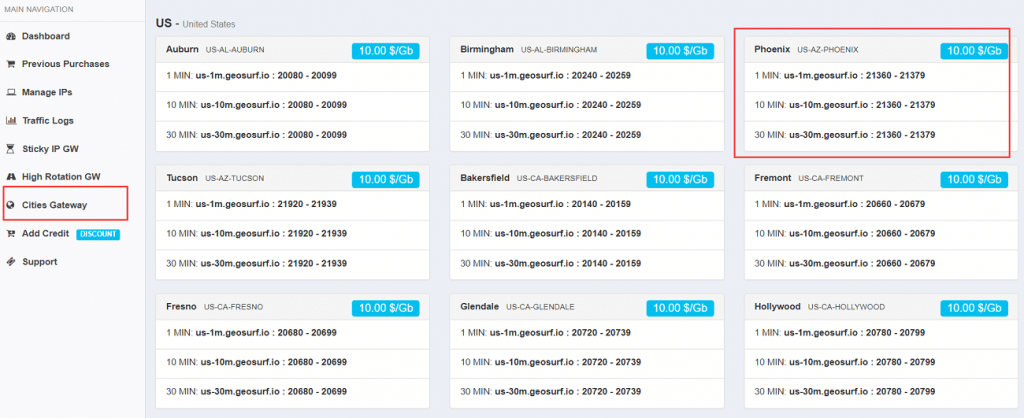
Why use the Geosurf Cities Gateway
The cities gateway is sticky IP addresses that can enable you, for example, to post ads to craigslist using an IP from a specific city. in our test, we used a 30 minute residential IP address from Phoenix.

How to Step GeoSurf in windows 10
If you read carefully about our guide to details of Geosurf proxies, You should 100% know how to use their proxies for It’s no different to other proxy servers. If you’re still not know how to use their proxies, I would like to show a sample about How to set up the proxy server in windows.
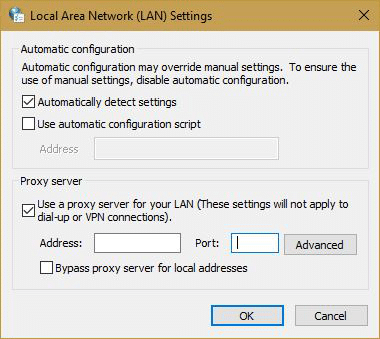
You can use GeoSurf in many ways, but the most common one is setting up a proxy on your computer. The best way to do this is through the Internet Properties settings in Control Panel. This procedure works the same on any version of Windows.
- Open Control Panel
- Go to “Internet Options”
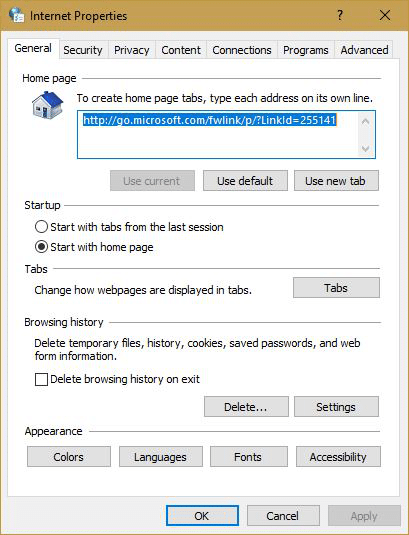
- A small window will open where you will need to navigate to “Connections.”
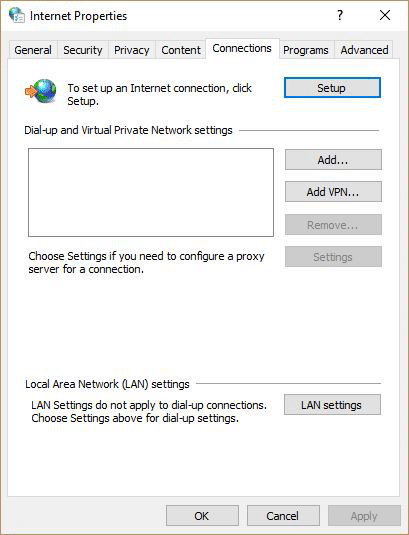
- On the bottom half of this section click on “LAN Settings.” Note: even though it says LAN, these settings will apply to LAN and WLAN connections, but not to dial-upor VPN connections.

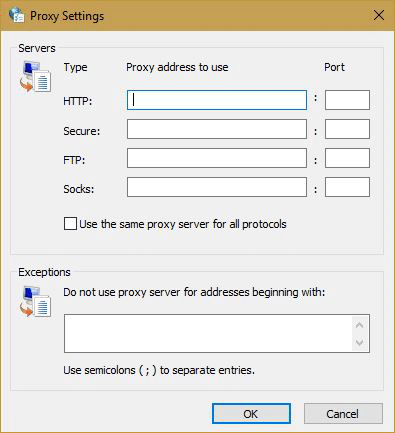
- Under Proxy Settings, tick the box where it says “Use a proxy server for your LAN” and then click on “Advanced.”

- Most users will use the same addresses for all four protocols. In that case, make sure to tick the box for “Use the same proxy server for all protocols.” If you intend to use different addresses, then leave the box unticked.
- Enter the address and port that you get from GeoSurf’s dashboard. Or, you can add exceptions for certain addresses that you don’t want to access through a proxy.
- When completed, click “OK” and close all other windows.
When you complete the steps, you will need to check if everything is working. To do that you will need to go to Google and type in “What is my IP address and compare it to the one you got earlier. If you need to use a proxy for a bot for scraping data, you will need to go to GeoSurf’s FAQ section on their website.
How to Step GeoSurf proxy on the Firefox
The steps above will apply a system-wide proxy setting. If you need to use a proxy on a browser only, you will need to install Firefox. It has a built-in section where you can set custom proxy for the browser only.
- Open Mozilla Firefox
- In the top right corner click on the drop-down menu and open Options
- In the General tab scroll to the bottom and under Network Proxy click on Settings.

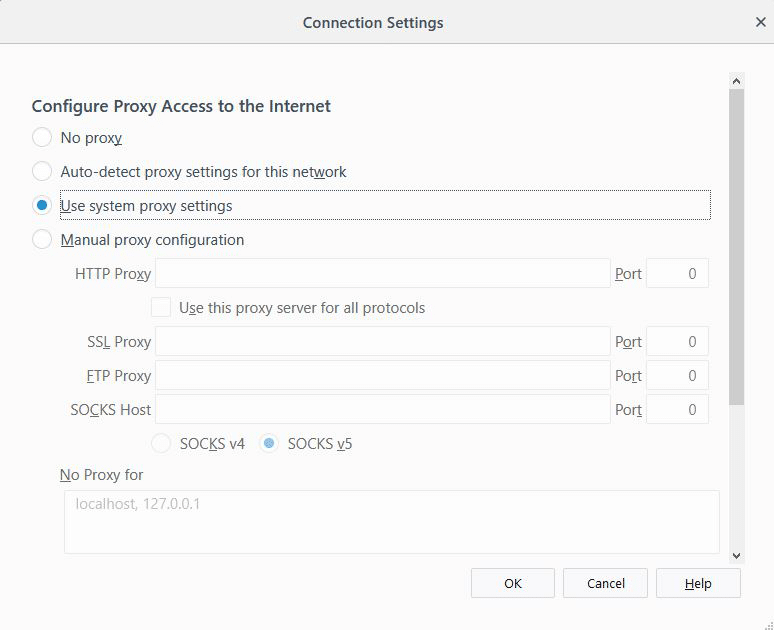
- Enable Manual proxy configuration
- Enter the proxy address and port
- Tick the box where it says “Use this proxy server for all protocols.”
- Optionally, you can add addresses that you don’t want to access through the proxy
- Once completed click OK and start browsing.
If you want to know How to set up a proxy in the other browser, Read this Article!
Summary
In general, GeoSurf is a service that will meet most users’ requirements. It is not the cheapest service on the internet. At your disposal, you are getting access to over 2 million addresses from over 130 countries.
All addresses are on fast servers which might be worth the extra buck. The dashboard is simple and easy to use, so you won’t need to spend the day learning it. But, but if you ever need support, bear in mind that you will only be able to get help via email.
Related: